How to root Sony Xperia Z1 Compact D5503
How to root Sony Xperia Z1 Compact D5503
Before to begin, download and install USB drivers for Sony Xperia Z1 Compact on your PC.
Directions
1. Unlock Bootloader (go to http://unlockbootloader.sonymobile.com/ and click “Start unlocking the boot loader“).
2. Start the phone in Fastboot mode (turn of the phone, then press Volume Up and connect your device to the computer through a USB port).
Or f you prefer other way, you can follow this steps to install CWM recovery:
1. Download and install Android SDK (you’ll find the link in “Download Sources“) on your PC and unzip the file in a folder called “Android SDK” on your Desktop.
2. Into the “Android SDK” folder you’ll find another folder called “SDK“, and into this one you will find another one called “platform-tools“.
3. Once you are in this “platform-tools” folder, press on Shift key on your keyboard and right-click on some white empty place in the folder. Doing this a menu will pop-up. Selecciona la opción de “Open command prompt here“.
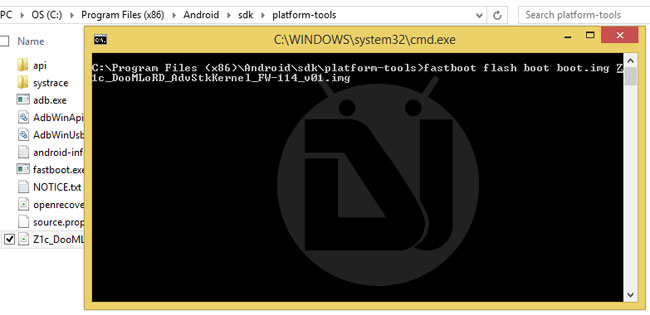
4. When the Command prompt window is open, keep it open. Downlodad the recovery image DooMLoRD on your computer through “Download Sources“.
5. Find the file you just download. It’s called “Z1c_DooMLoRD_AdvStkKernel_FW – 114_v01.img“.
6. Paste the file Z1c_DooMLoRD_AdvStkKernel_FW – 114_v01.img into “platform-tools” that you have open on the Desktop.
7. Active USB Debugging mode, go to Sony Xperia Z1 Compact Settings area. Inside Settings area find and press on About Device.
8. After that, go down and look for the build number. Tap several times on the build number until a little window appears and says “You are now a developer“.
9. After activing Developer mode, go back to Settings and down to Developer to press on it. Check the USB Debugging option and set up.
10. Connect through micro USB the phone to the PC.
11. Go again to the Command prompt window and type in adb devices and adb reboot bootloader.
12. After using this to reboot your device in bootloader, it’s the moment to start flashing custom recovery. For this, enter Z1c_DooMLoRD_AdvStkKernel_FW – 114_v01.img in the command window on the PC.
13. Flashing will start now. Don’t disconnect your phone.
14. When flashing is finished, enter in “fastboot reboot” in command window. Once Z1 Compact boot custom recovery should be installed and working.
15. Keep open the Command prompt for the next steps.
ROOT:
1. Download SuperSU through the link below (“Download Sources”). Copy UPDATE-SuperSU-v1.91.zip you downloaded and place it on the Storage area of your Sony Xperia Z1 Compact.
2. Go to the command window and type the command adb reboot recovery. The device will restart in CWM recovery.
3. Into CWM recovery, check the “Install Zip” option on the menu.
4. Select UPDATE-SuperSU-v1.91.zip, the device will start the flashing procces. Don’t turn off your phone.
6. After flashing, restart your device.
Download
Check if your Sony Xperia Z1 Compact D5503 is rooted correctly using our app “How to ROOT”.
Download Android USB Drivers app
Download sources
DOWNLOAD DRIVERS Ads