How to configure the contact list in Android
How to configure the contact list in Android
The contact list is one of the strong points of our phone. A few years ago, all our concern was to store the contact list in the SIM card, trying not to lose any contact and in case we had to change our mobile phone. Times changes, and now we have the contact list safely stored in the cloud. To do that, we only have to activate the automatic synchronization with Gmail.
Moreover, to maximize the possibilities of Android and Gmail, we can make some small adjustments to better organize our contacts, and to customize the list to fit our preferences. We will see here how to configure and customize the contact list in Android devices.
Syncing contacts with Gmail
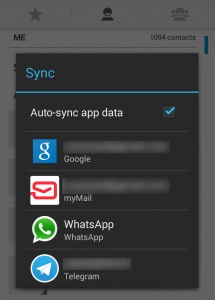
In general, the contacts stored in our phone automatically syncs with Gmail. However, this process can be disabled, in which case the contacts added to our contact list are not stored in the cloud and we will not have any back up for them. To avoid this potential problem, we have to check if we have correctly defined the synchronization options.
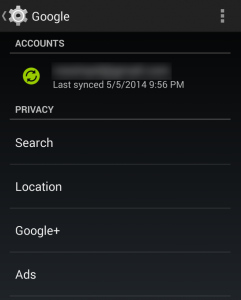
We can adjust this option from the Google account access that we can find in the Settings menu. There, we just need to find the option to enable the synchronization of our contacts with Google.
How to choose which contacts we want to display in the contact list
By default, Android displays all the contacts of our list, in alphabetical order, either they have or not a phone number associated. It is advisable to apply some kind of filter to avoid having a long list of contacts, many of which correspond to mail addresses without any phone number.
One option we have consists on filtering the contacts so that we only see those with a phone number. This option can be configured in the settings menu of the Contacts app. Thus, we will reduce the list to the people that are really helpful to have in a contact list of a phone.
Moreover, from the Gmail website, we can review the contacts and remove duplication, simplifying the general view of the list.
Finally, we can create a list of favorites, with those contacts that we call more often. To add a contact to this list, we just have to enter in the contact details and mark the star that appears on the upper right corner.
However, the customization that Android offers can’t do much more. If we want to organize better our contacts, we have to install some specific app that gives us more options. There are many in the Play Store, both free and paid, although one of the best (and free!) it’s Contacts+.
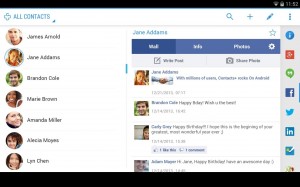
Contacts+ is a complete communications manager that can use both SMS and social networks. Its main screen is divided into SMS, contacts and call log while on the right we find all the social networks available. It also lets you customize the contacts display, and offers many more options than the native Android app.
If we want to further organize our contact list, we can download the free app Contacts+ from the Google Play.