How to configure Wi-Fi options
It is very easy to configure the Wi-Fi option for our device in order to not be always connected when we have it in hibernation mode. That can be very useful in case we need to extend the battery life as there are applications running in the background that are can be using the Wi-Fi even when we are not aware of it.
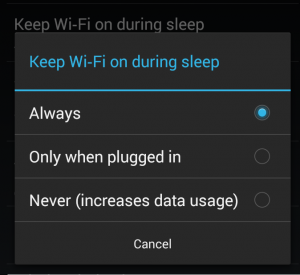
Android offers three default levels of wireless activity during hibernation. We can have it always on; we can have it activated only when the device is in connected, or we can completely disable it during hibernation.
Thus, by restricting the time our smartphone is using Wi-Fi, we can increase the duration of the battery life.
This is especially important when we are on the go or somewhere with several networks available, because our device, despite being in hibernation, is continually looking for the best network to connect to, wasting battery unnecessarily.
How to configure the Wi-Fi options
If we go to the Settings, we are going to find the Wi-Fi menu. Once you have access to it, in the bottom right we have the setup menu (3 vertical dots). Through this menu, you can access to the advanced settings.

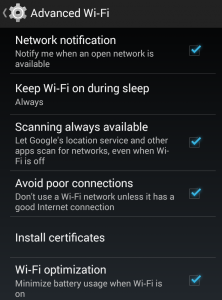
Once inside, we are going to find several options that we can turn on or off, such as receiving notifications when there are available networks, actively seek for networks, or to optimize battery usage when using Wi-Fi. In addition, we can also find the option to configure the use of Wi-Fi in suspension mode.

Entering this option, we can see the three options for hibernation. With one click, we can change the preferences and optimize them to gain a bit more battery life for our device.
However, we should keep in mind that the battery drained by the Wi-Fi is not as important as other applications. If we have trouble getting to the end of the day, it is advisable to optimize better the resources, in order to not be wasting battery with applications running on the background or with excessive brightness on the screen.
